Running WordPress in the Browser
 Jesús González
Do you know it is possible to run WordPress entirely in your browser?
This is possible because of WebAssembly, also known as Wasm: an exciting and rapidly growing technology that allows you to compile many different programming languages into portable binaries. These binaries can run in most modern browsers as well as many other platforms, including cloud and edge computing. At VMware's OCTO Wasm Labs we are working to accelerate developer adoption of WebAssembly. We put together this Wordpress in Browser demo as a way to highlight the capabilities of this new technology.
The remaining of this article introduces WebAssembly, explains how to use it to run PHP projects in the browser, and does a deep dive into the technical details of how it runs under the covers. Our goal is to get you excited about the capabilities of WebAssembly and start thinking how to use it for your own projects. Future projects and articles will cover a variety of other topics, including using Wasm on the server side
- What is WebAssembly?
- WordPress, PHP and SQLite.
- Emscripten: a C/C++ to WebAssembly compiler toolchain.
- How to compile PHP + SQLite to WebAssembly.
- JavaScript 'glue code' and File Management in WebAssembly.
- Setting up and bootstrapping WordPress.
- Loopback Request, or how to cheat the browser.
- Showtime!
- What's next?
What is WebAssembly?
WebAssembly (or Wasm for short) is an open standard that defines a portable binary format for executable programs. It's open, portable, efficient, secure and polyglot.
- Open: WebAssembly is an open standard from the W3C as well as supported by the Bytecode Alliance, a non-profit organization whose members include companies as diverse as Amazon, Microsoft, Apple, Google, Intel, ARM, and of course, VMware.
- Portable: WebAssembly is platform and OS-agnostic. It supports all major CPU types (including Intel x86, Arm and RISC-V), all major operating desktop and mobile operating systems and it is supported by all major browsers (Firefox, Chrome, Edge, Safari) without requiring any additional extension or plug-in. Smart TVs and other embedded devices are starting to ship support for Wasm.
- Efficient: By design WebAssembly can run at nearly native speed. Most popular Wasm runtimes provide just-in-time (JIT) and ahead-of-time (AOT) compilation. It doesn't suffer from cold-starts and it can be run with minimum CPU and memory requirements.
- Secure: WebAssembly is secure by design. Wasm modules run sandboxed by default with a capabilities-based model for accessing resources.
- Polyglot: Many programming languages (including C/C++, C# and Rust) already support WebAssembly as a platform target. Instead of building binaries for a native platform, such as x86, the code can be compiled to the Wasm binary format. It can then run anywhere where a Wasm runtime exists.
The WebAssembly ecosystem is expanding rapidly, both in the browser and in other platforms such as cloud and the edge.
WordPress, PHP and SQLite
We picked WordPress for our demo because it is one of the most popular CMS (Content Management System). Some iconic sites powered by WordPress include The White House or The Walt Disney Company.
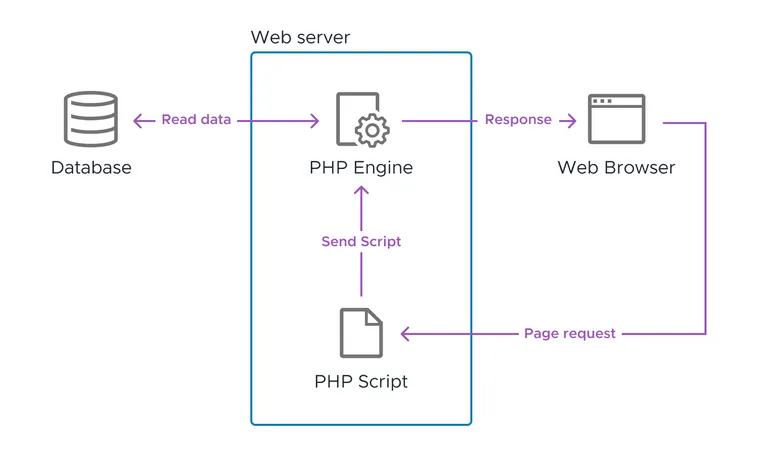
WordPress is based on the popular PHP server side web development language. It follows the traditional client-server model, being hosted on a web server. Each time the browser requests a new page, the server runs the PHP engine that processes the PHP source code on that page. After executing that logic, which usually involves several database operations, it generates the HTML page that will be served back to the browser to be rendered.
Running WordPress in the browser means reproducing all that behavior entirely on the client side. In turn it means that both the PHP runtime and the database need to be compiled to WebAssembly so they can run within the browser:
- The PHP official interpreter is written in C. Instead of compiling the PHP code directly to WebAssembly, we compiled the PHP runtime into WebAssembly and use it to run the unmodified PHP source code from WordPress.
- WordPress supports different DBMS, although is commonly used with MySQL. For the purpose of this demo, we chose SQLite, a well-known lightweight alternative that is self-contained, SQL-compatible, portable, and used by several popular projects.
Emscripten
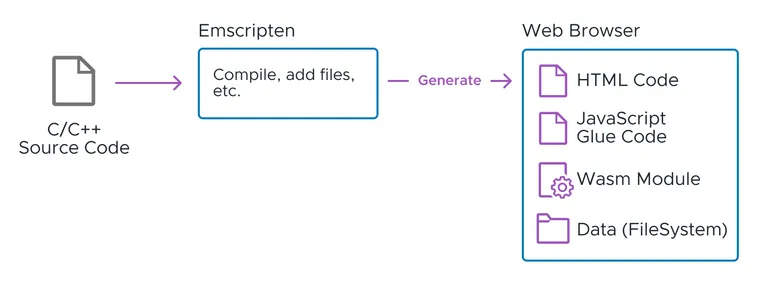
Emscripten is one of the first C/C++ to Wasm compiler toolchains. It consumes C/C++ source code to generate Wasm bytecode and associated JavaScript code. This additional JavaScript 'glue code' is necessary to connect the sandboxed Wasm code to the outside world and provide functionality such as filesystem access, networking and 2D/3D graphics by providing a bridge to the browser JavaScript engine.
If you are familiar with the GNU toolchain (configure, make, gcc, g++, etc.), what you will find in the Emscripten SDK (emsdk, for short) is a set of drop-in replacements for those well-known commands such as emconfigure, emmake, emcc, em++, etc. These command wrappers set the appropriate environment variables for a genuine C/C++ project to be compiled by emsdk with few or no modifications. An easy way to get started with Emscripten is to use the official Docker container with the entire emsdk already set up.
Compiling PHP + SQLite to WebAssembly
Compiling a language runtime such as PHP is a complex task. There are many configuration options available in the configure script you might want to consider (./configure --help shows 200+ options). For our demo, we mainly need to ensure that SQLite support and the PDO (PHP Data Objects) extension are enabled. In this regard, oraoto/pib and seanmorris/php-wasm are great projects that successfully compiled PHP 7.4 to WebAssembly with SQLite support using Emscripten.
So, let's start from there!
Once emsdk is properly set up, we must rebuild the PHP configure script, and then invoke the classical configure / make pair commands but with the appropriate Emscripten wrappers emconfigure / emmake. This way, when executing the new Makefile generated by configure, it will invoke emcc and em++ instead of gcc and g++. Notice the specific SQLite and PDO flags passed to the configure script to enable the SQLite support.
./buildconf --force
emconfigure ./configure --with-sqlite3 --enable-pdo --with-pdo-sqlite
emmake make -j8
The emcc compiler accepts most gcc arguments for compatibility, but since its purpose is different (generating Wasm bytecode + JavaScript source code to overcome different limitations), it also accepts an additional list of arguments that will be extremely helpful for your project's particular needs. In addition, there are specific build options that will be certainly needed for helping emcc to emit the right JavaScript source code. Let's focus on a few of those build options that are relevant to the final build of the PHP Wasm module:
| Variable | Description |
|---|---|
EXPORT_NAME = 'Module' |
This is the JavaScript global variable where the Wasm module will be exported. Named "Module" by default. |
EXPORTED_FUNCTIONS = [] |
List of functions that will be exported from C/C++ to be invoked from the JavaScript world. It usually comprehends your API to the Wasm module. |
ENVIRONTMENT = 'web, webview, worker, node' |
Emscripten supports four different environments (or profiles) that can be combined. Here we are telling Emscripten where we expect to run our module so it can perform a tradeoff between portable or optimized JavaScript source code. |
MODULARIZE = false |
Emscripten can emit the JavaScript in two flavors: a) in the global scope to be directly loaded into a script tag from your code, or b) wrapped into a function that returns a promise which will be resolved once the module is properly loaded. The latter is usually preferred since it allows more control over the loading stage. |
INITIAL_MEMORY = 16777216 (16MB), ALLOW_MEMORY_GROWTH = false, MAXIMUM_MEMORY = 2147483648 (2GB) |
Memory management in Wasm follows a linear model, where a continuous chunk of memory is allocated at the module load time. This array can be set up to grow to make room for new dynamic allocations, but that will imply a memory reallocation at run-time which is a costly operation. So, setting up these parameters accordingly would have an impact on your application performance. |
USE_<PORT_NAME> = false |
Emscripten offers a repository of common-used libraries in C/C++ already compiled known as ports. For instance, if your project requires Boost, you can reuse the official Emscripten port instead and save some compilation time. |
Once the parameters and build options are properly defined, you can invoke emcc --o to generate the final Wasm binary. Now, depending on the file extension we provided, we can expect three different build artifacts:
.wasm : This will generate a stand-alone Wasm without any JavaScript 'glue code'. You will be responsible for loading the module into the browser..js : In this option, Emscripten will produce both the Wasm binary and the supporting JavaScript 'glue code'. Using this code from your JavaScript will automatically tell the browser how to load and initialize your Wasm binary..html : Finally, Emscripten can also generate a simple but self-contained demo environment for your build. In addition to the.jsfile and the.wasmfile, it will generate a .html file that you can directly open in your browser.
JavaScript glue code and File Management
As mentioned earlier, JavaScript 'glue code' helps to load and initialize the Wasm module as well as providing access to functionality not being yet standarized or available inside the Sandbox. Let's have a quick look inside the code generated by Emscripten:
var PHP = (function() {
  var _scriptDir = typeof document !== 'undefined' && document.currentScript ?
    document.currentScript.src : undefined;

  return (
function(PHP) {
  PHP = PHP || {};

/* This line continues to infinity and beyond */
var Module=typeof PHP!=="undefined"?PHP:{}; /* ... */

  return PHP.ready
}
);
})();
if (typeof exports === 'object' && typeof module === 'object')
      module.exports = PHP;
    else if (typeof define === 'function' && define['amd'])
      define([], function() { return PHP; });
    else if (typeof exports === 'object')
      exports["PHP"] = PHP;
The first item to notice is a global variable named PHP. This is the result of setting up the build option EXPORT_NAME = 'PHP'. The most relevant items come in the var Module= line, where all the structures needed to load the Wasm module are defined. The ready method is being defined as a JavaScript promise. By default it comes in a single line for optimization purposes, but after a 'beautify' process it is possible to understand the internal functionality included.
When the PHP runtime is executed in the server, it has access to the local filesystem where the .php files from the project can be accessed. Running in the user's browser means that somehow, we need to include the local filesystem into the WebAssembly module. And this is where the Emscripten File System API comes to play by offering several filesystems for different purposes. Since WordPress does not need to modify the .php files, we will use MEMFS for our demo, a non-persistent in-memory filesystem that is also enabled by default in Emscripten.
When linking the final Wasm binary, we need to tell Emscripten which files must be packaged. There are two methods that can also be combined: embedding and preloading:
- Embedding: Including the file contents directly inside the JavaScript code. This approach is not very efficient, so it is recommended only for a few small files (e.g.: configuration files, etc.).
- Preloading: Emscripten will generate an additional
<name>.datafile by aggregating all the files' contents. These contents will be asynchronously loaded into the MEMFS at the Wasm module loading time.
It makes sense for the WordPress demo to preload all content, including the .php files plus some static assets. As a result, Emscripten includes in the JavaScript 'glue code' additional statements for populating the MEMFS file system and for extracting the corresponding content from the .data file:
Module["FS_createPath"]("/","preload",true,true);
Module["FS_createPath"]("/preload","Zend",true,true);
Module["FS_createPath"]("/preload","wordpress-6.0",true,true);
Module["FS_createPath"]("/preload/wordpress-6.0","wp-admin",true,true);
/* ... */
In the above fragment, the different calls to FS_createPath are constructing the directory hierarchy within the MEMFS file system according to the files packed into the .data file.
In the code below, the attributes passed to the loadPackage() method tell in which position (in bytes) a specific file starts and ends within the .data file. With these steps, the PHP runtime within the Wasm module will be able to access all the preloaded files as if it were accessing them locally.
loadPackage({
  "files": [
    { "filename": "/preload/Zend/bench.php", "start": 0, "end": 7634, "audio": 0 },
    { "filename": "/preload/wordpress-6.0/.htaccess", "start": 7634, "end": 8157,"audio":0 },
    { "filename": "/preload/wordpress-6.0/index.php", "start": 8157, "end": 8562, "audio": 0 }
    /* ... */
  ]
})();
Setting up and Bootstrapping WordPress
We have already included SQLite support in PHP. Now we need to set up WordPress to use it, and that is what the project wp-sqlite-db is about, by offering a single drop-in replacement file (db.php) to be placed within the wp-content/ directory.
The WordPress database configuration is set up in wp-config.php, and there are two main variables we must define: DB_FILE and DB_DIR. In the example below, we are specifying that the SQLite database will be stored in the file wpsqlite.db along with wp-config.php (__FILE__ is a constant with the full path of the current file).
define('DB_FILE', 'wpsqlite.db');
define('DB_DIR', dirname(__FILE__).'/');
At this point, all the ingredients for our WordPress demo are ready! We just need to bootstrap it by running index.php as the main script. Since we are simulating a webserver within the browser, we also need to set up multiple variables at the PHP level so that WordPress can find the different assets.
$docroot = '/preload/wordpress-6.0';
chdir($docroot);

define('WP_HOME', $docroot . '/');
define('WP_SITEURL', $docroot . '/');

ob_start();

require_once 'index.php';
Some other PHP pre-defined variables ($_SERVER, $_GET, $_POST, etc) depend on the specific request triggered by the browser so they must be updated accordingly. In this case, the different request parameters are injected as a JSON string into the PHP code, where they are deserialized and their parameters used. In the next section, we will discuss how we capture these outgoing requests.
$request = (object) json_decode(
  '${JSON.stringify(cleanParams)}'
  , JSON_OBJECT_AS_ARRAY
);

$_GET = $request->_GET;
$_POST = $request->_POST;

$_SERVER['SERVER_SOFTWARE'] = ${JSON.stringify(cleanParams.userAgent)};
$_SERVER['REQUEST_URI']     = $path;
$_SERVER['REMOTE_ADDR']     = '127.0.0.1';
$_SERVER['SERVER_PORT']     = 3333;
$_SERVER['REQUEST_METHOD']  = $request->method;
$_SERVER['PHP_SELF']        = '';
Loopback Request
Since there is no remote PHP server for this demo, every time a new PHP document is requested from the browser to the server, an error is shown in the debugging console telling us that a GET request could not be completed. Therefore, we need to find a way for the outgoing request to loop back into our Wasm module where all the PHP documents are contained. This is the problem that seanmorris/php-wasm solves, so we started with that code as a base and extended it in different ways to support Wordpress-specific scenarios.
A Service Worker acts as a proxy between the browser and the target server. As a sub-type of a Web Worker, it runs in a background thread and communicates with the main application using a message-driven system. They are associated with the current site, and they can be enabled only in secure contexts (HTTPS). Once the service worker is installed and activated, it starts capturing all the outgoing requests from the browser, returning an empty response, and sending a message back to the main application.
/**
 * The main method. It captures the requests and loop them back to the main
 * application using the Loopback request
 */
self.addEventListener("fetch", event =>
  event.respondWith(
    new Promise(accept => {
      const url = new URL(event.request.url);
      if (isInternalRequest(url)) {
        // Capture the event and post a message
        console.log(`[ServiceWorker] Captured request: ${url.pathname}`);
        return Promise.all([
          self.clients.matchAll({
            includeUncontrolled: true
          }),
          parsePost(event)
        ]).then(([clients, post]) => {
          clients.forEach(client => {
            client.postMessage({
              path: url.pathname,
              method: event.request.method,
              userAgent: navigator.userAgent,
              _GET: url.search,
              _POST: post || null
            });
          });
          accept(new Response(""));
        });
      } else {
        accept(fetch(event.request));
      }
    })
  )
);

/**
 * Returns true when we consider the URL should be served by the
 * worker / WASM module
 */
const isInternalRequest = url => {
  return /.*\/wordpress-6.0[\w\/\-]*(?:(?!\.\w+)|\.php)$/.test(url.pathname);
};
The main application reacts to the message by generating a new PHP script and sending it to the WordPress Wasm module. The output of the Wasm module is mounted on the internal iframe from our demo as a fake and functional "browser within a browser".
Showtime!
Our working demo is ready and you can try it at https://wordpress.wasmlabs.dev/. In summary, WordPress is running within the browser thanks to the PHP language runtime and SQLite both being compiled into a Wasm module. Such a module is downloaded by the browser automatically when the user opens our demo page.
Some of the working features you can try are:
- Navigating between different posts that include text, pictures and comments.
- Add new comments to an existing post.
- Login as
admin:admininto the WordPress administration panel by typing/wp-login.phpin the demo navigation bar.
Since we wanted to provide you with the most realistic browser experience, we implemented a set of extra features on the browser side by:
- Enable navigation and history.
- Allow reloading the page.
- Load cookies and set them on the PHP script.
Challenges and limitations
There is still room for improvement, here are some known limitations:
- If the page is reloaded then the changes will be lost since the database is only local to your tab in your browser. To preserve state, it would be interesting to explore how to save the Wasm module linear memory into the browser's local storage and how to restore it.
- Some assets (.js/.css) are currently served as static resources from the server instead of from the Wasm module. The reasons behind this decision are:
- We are running the WordPress Wasm module in the main application instead of the service worker. It means that every fetch request generates a static HTML code that is pushed into the iframe. To return the different static access that a WordPress page may request from the Wasm module, it must be run in the service worker and use the Response object instead of the current messaging approach.
- There is an open bug in Chromium that prevents us from capturing static resource requests (.js/.css files) from inside the iframe.
- At the time of writing this post (July 2022), 6.0 is the latest stable version of WordPress, and 7.4 is the most used version of PHP and the one originally compiled by oraoto/pib. We want to try PHP 8.1 which is currently the latest.
During the development of the demo environment, we found several challenges but it was fun to find alternatives and explore how to overcome them:
- Browsers and webservers do more than you usually remember. History management, parameters and cookies are managed between the browser and the server without almost any overhead. When you want to simulate those, it is not easy!
- Cookie support is required to define the different cookies on the PHP side. Inspired by the way seanmorris/php-wasm captures
Locationheaders in the WordPress response, we implemented a parser forSet-Cookieheaders that stores them locally. Then, the different cookies are defined in the PHP scripts to maintain the session. This allows you to login into the demo and leave a message as an administrator.
What's Next?
There are plenty of great resources covering WebAssembly, with the Fermyon Blog and the Wasm days Youtube channel being great examples.
There's a lot about WebAssembly that we did not cover, including the WASI (WebAssembly System Interface) which provides a standard way to interface with a host operating system without requiring a JavaScript engine. Stay tuned as our future projects will cover server-side WebAssembly and introduce exciting applications for AI/ML and Edge computing. Follow us on Twitter to keep in touch with us.